What is Residential Asbestos Removal?
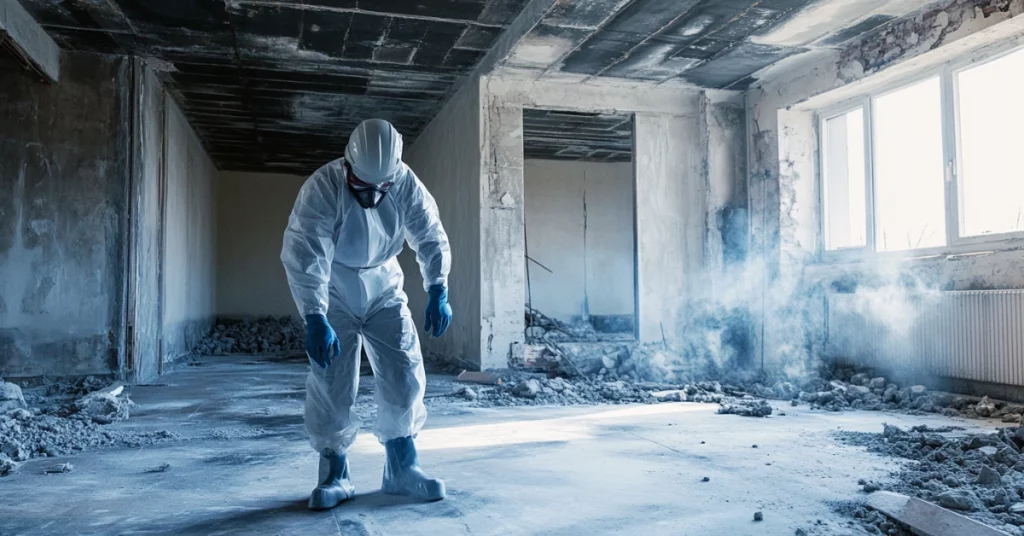
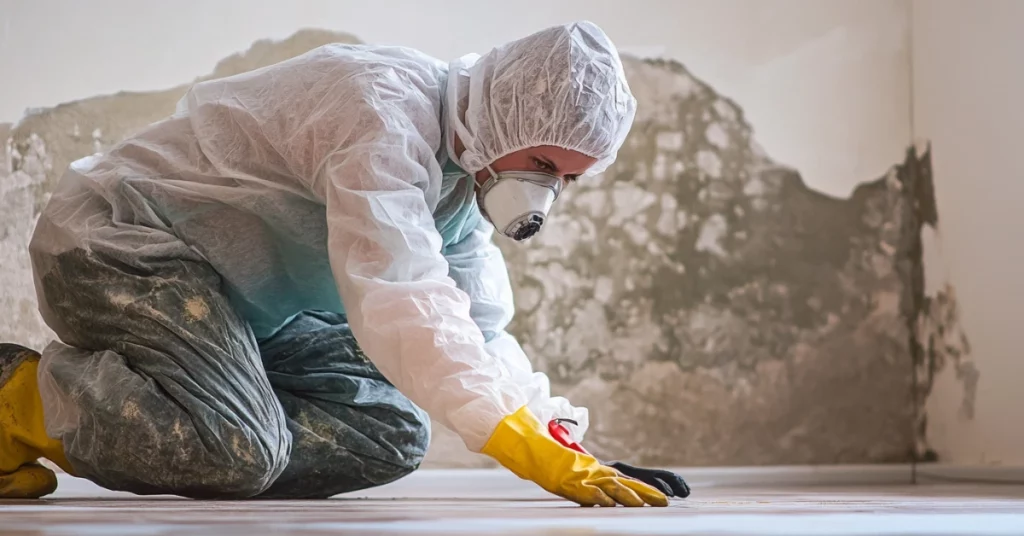
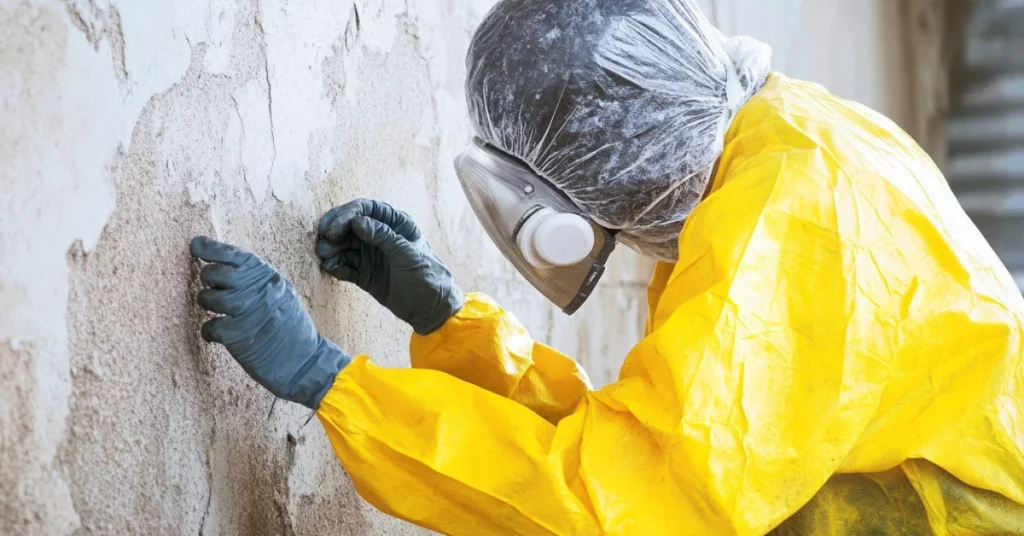
Residential asbestos removal is the process of safely extracting materials containing asbestos from homes. This procedure requires trained professionals who follow strict regulations and use specialized equipment to ensure safety.
Asbestos, a group of naturally occurring minerals, was once widely used in building materials due to its heat-resistant properties. However, when disturbed, asbestos can release tiny fibers into the air, posing serious health risks if inhaled. This is why proper removal is essential for maintaining a safe living environment.
Professional home asbestos removal services typically involve these key steps:
- Thorough inspection and material testing
- Creating a detailed removal plan
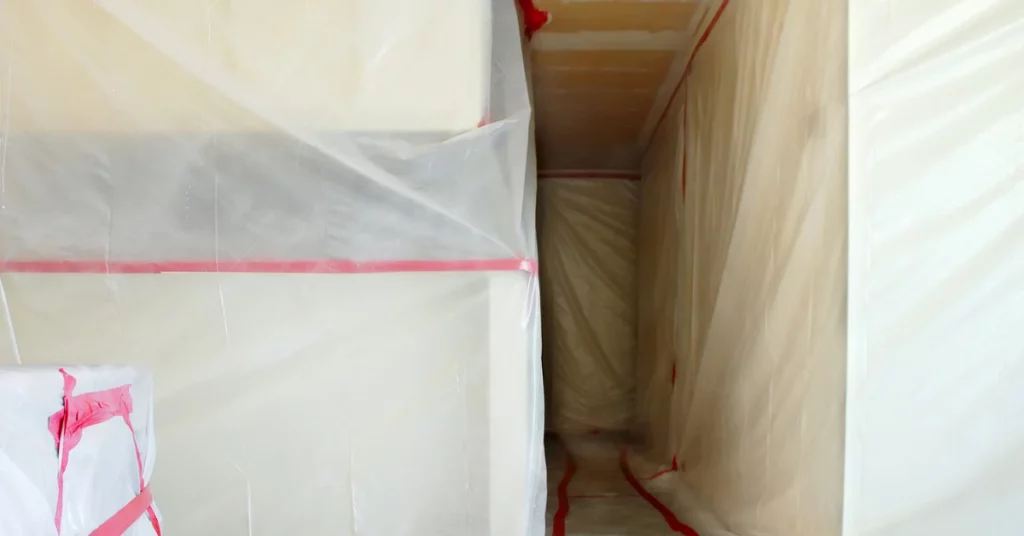
- Setting up containment areas to prevent fiber spread
- Carefully removing asbestos-containing materials
- Properly disposing of asbestos waste
- Conducting a final inspection and air testing
It’s important to note that homeowners should never attempt to remove asbestos themselves. The risks associated with improper handling are significant, and there are legal requirements governing its removal and disposal.
What Are the Steps for Residential Asbestos Removal?
Residential asbestos removal is a careful, systematic process that professionals follow to ensure safety. The typical steps include:
- Initial Inspection: A certified inspector examines the property to identify asbestos-containing materials.
- Risk Assessment: Professionals evaluate the condition of the asbestos and determine the best removal approach.
- Planning: A detailed removal plan is created, including safety measures and disposal methods.
- Preparation: The work area is sealed off to prevent asbestos fibers from spreading to other parts of the home.
- Removal: Using specialized tools and techniques, workers carefully remove the asbestos-containing materials.
- Cleaning: The area is thoroughly cleaned using HEPA vacuums and wet-wiping techniques.
- Disposal: Asbestos waste is sealed in special containers and disposed of at approved facilities.
- Final Inspection: The area is inspected to ensure all asbestos has been removed.
- Air Testing: Air samples are taken to confirm that asbestos fiber levels are safe.
The exact procedure may vary depending on the specific situation and local regulations. Asbestos removal is not a DIY project. Always hire certified professionals to handle this dangerous material and ensure your home remains safe.
What is Residential Asbestos Encapsulation?
Residential asbestos encapsulation is an alternative method for managing asbestos-containing materials in homes. Instead of removing the asbestos, this approach involves sealing it in place to prevent fiber release.
During encapsulation, professionals apply special coating materials that create a barrier over the asbestos, stopping fibers from becoming airborne and reducing the risk of exposure.
Encapsulation can be a suitable option in certain situations, such as when the asbestos-containing material is in good condition, if removal would be too disruptive or costly, or when the asbestos is in a location that’s unlikely to be disturbed. However, it isn’t always the best choice.
Removal might be necessary if the asbestos-containing material is damaged or deteriorating, if the area will undergo renovations or demolition in the future, or if local regulations require removal.
Encapsulation is often less expensive upfront and usually takes less time than removal. However, removal provides a permanent solution, while encapsulation requires ongoing monitoring.
Ultimately, the choice between encapsulation and removal depends on your specific situation. Consulting with a certified asbestos professional can help you make the best decision for your home, ensuring the safety of your living environment while considering cost and time.
What Are the Steps for Residential Asbestos Encapsulation?
Residential asbestos encapsulation involves a series of steps to ensure the asbestos-containing materials are properly sealed and made safe. The typical process includes:
- Inspection: A certified professional examines the area to confirm the presence of asbestos and assess its condition.
- Planning: Based on the inspection, a detailed encapsulation plan is developed, including the choice of encapsulating material.
- Area Preparation: The work area is isolated to prevent any potential spread of asbestos fibers during the process.
- Surface Cleaning: Any loose asbestos fibers are carefully removed using specialized equipment.
- Repair: If the asbestos-containing material is slightly damaged, it’s repaired before encapsulation.
- Encapsulant Application: The chosen sealant is applied, often in multiple layers, to fully coat the asbestos-containing material.
- Curing: The encapsulant is allowed to dry and cure completely.
- Inspection: A final check ensures the encapsulant covers all necessary areas and has no gaps or thin spots.
- Air Testing: Air quality is tested to confirm no asbestos fibers were released during the process.
- Documentation: A report is provided detailing the encapsulation work and any future monitoring requirements.
The specific steps may vary depending on the type of asbestos-containing material and its location in the home. While encapsulation can be effective, it requires ongoing monitoring to ensure the sealant remains intact over time.
Proper encapsulation by certified professionals can significantly reduce the risk of asbestos exposure in your home, providing a safer living environment for you and your family.
How Do I Know if My Home Contains Asbestos?
Identifying asbestos in your home can be challenging, as it’s not always visible to the untrained eye. However, there are several ways to determine if your home might contain asbestos:
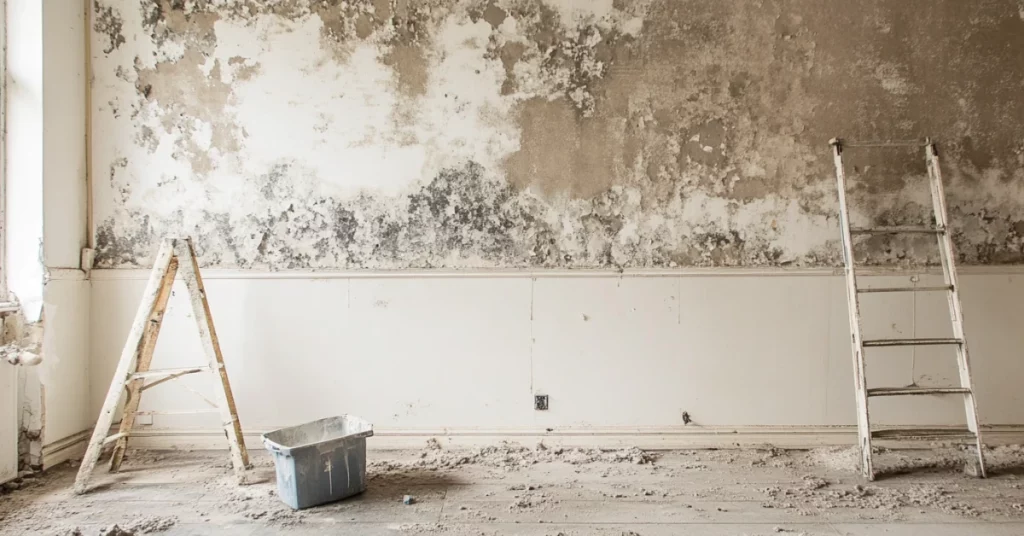
Age of Your Home: If your house was built before the 1980s, it’s more likely to contain asbestos. Asbestos was widely used in construction materials until its health risks became widely known.
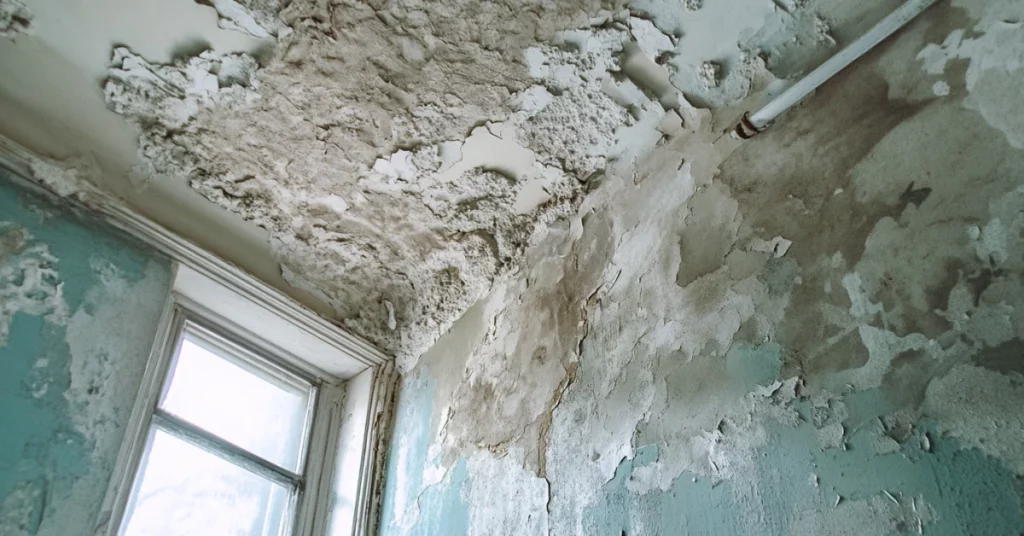
Common Locations: Asbestos was often used in insulation, flooring, ceiling tiles, roof shingles, and around pipes. Pay attention to these areas in older homes.
Visual Clues: While you can’t identify asbestos just by looking at it, certain materials are more likely to contain asbestos. These include:
- Popcorn ceilings (especially in homes built before 1980)
- Old floor tiles, particularly 9-inch squares
- Insulation around pipes or in walls that looks like corrugated paper
- Roof shingles with a grainy, asphalt-like appearance
Professional Inspection: The most reliable way to determine if your home contains asbestos is to have it inspected by a certified asbestos professional. They can safely take samples and have them analyzed in a lab.
If you suspect a material contains asbestos, don’t touch or disturb it. Undamaged asbestos-containing materials generally don’t pose a health risk if left alone. However, if the material is damaged or you’re planning renovations, it’s crucial to have it professionally assessed.
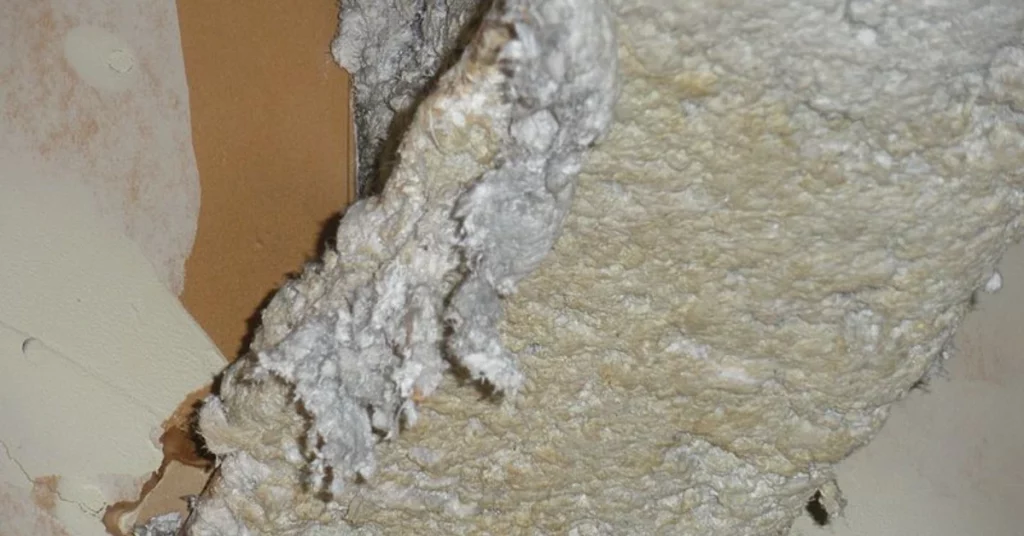
What Does Asbestos Look Like in Residential Properties?
Asbestos can take various forms in residential properties, making it challenging to identify without professional testing. However, understanding its common appearances can help homeowners recognize potential asbestos-containing materials:
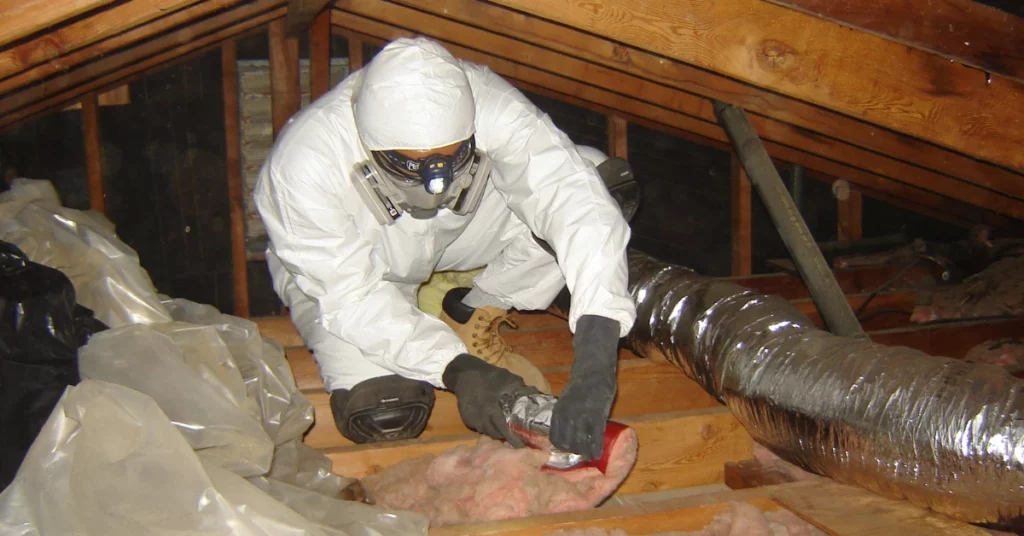
- Insulation:
Asbestos insulation often looks like fluffy, gray or white material. It may be found in attics, walls, or around pipes and boilers. Vermiculite insulation, which sometimes contains asbestos, appears as light-weight, pebble-like material.
- Floor Tiles:
Asbestos floor tiles are often 9×9 inches, though 12×12 inch tiles may also contain asbestos. They can be various colors and may have a streaked or mottled pattern. The backing or adhesive used with these tiles might also contain asbestos.
- Ceiling Tiles:
Asbestos ceiling tiles typically have a pinhole pattern or textured surface. They’re often 12×12 inches and may be found in drop ceilings.
- Popcorn Ceilings:
These textured ceilings, popular from the 1950s to the 1980s, can contain asbestos. They have a bumpy, cottage cheese-like appearance.
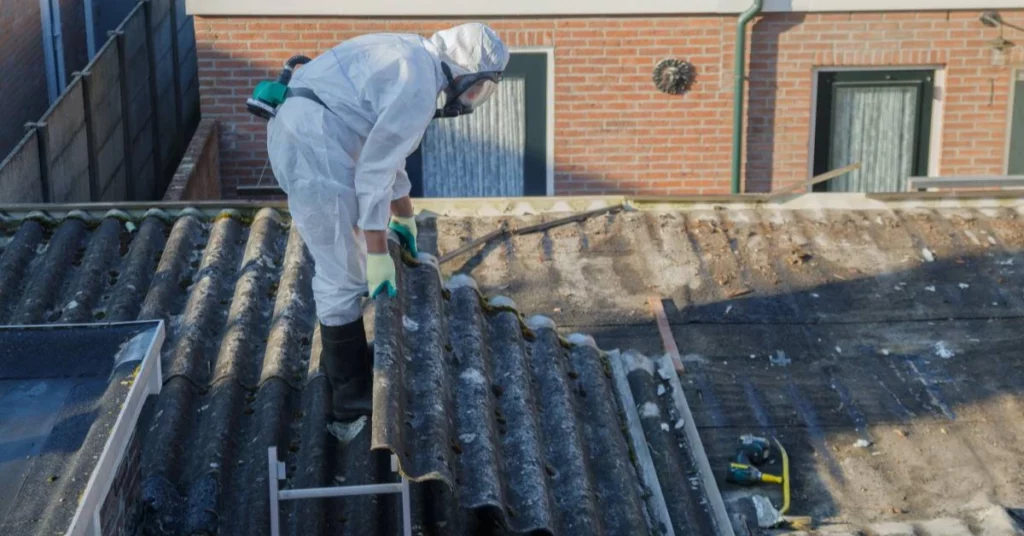
- Cement Products:
Asbestos-cement products, such as siding or roof shingles, have a grainy appearance and are typically gray in color.
- Pipe Insulation:
Often called “pipe lagging,” this can look like corrugated paper wrapped around pipes. It may be white, gray, or pale blue.
- Textured Paint:
Some textured paints and coatings used on walls and ceilings may contain asbestos. These have a raised, bumpy texture.
Asbestos can’t be definitively identified by sight alone. If you suspect a material in your home might contain asbestos, especially if it’s damaged or you’re planning renovations, it’s crucial to have it professionally tested. Always prioritize safety and consult with certified asbestos professionals for proper identification and management.
How Much Does Residential Asbestos Removal Cost?

The cost of removing asbestos from homes in Florida varies based on several key elements. These include:
- Project size
- Asbestos quantity
- Removal difficulty
- Location within the house
On average, home asbestos removal cost in Florida ranges from $1,500 to $30,000. Smaller jobs, like removing asbestos from a single room, typically fall on the lower end. Larger projects, such as whole-house remediation, can reach the higher end of the spectrum.
Here’s a breakdown of asbestos abatement pricing for houses:
| Factor | Cost Range |
| Size (per sq ft) | $5 – $20 |
| Quantity (per cubic foot) | $10 – $30 |
| Difficulty (easy to hard) | $500 – $5,000 extra |
| Location (accessible vs. confined) | $200 – $2,000 extra |
Additional expenses to consider:
- Permits: $50 – $200
- Post-removal testing: $400 – $900
- Containment setup: $500 – $1,500
- Disposal fees: $200 – $400 per ton
The type of asbestos-containing material also affects the overall cost. For example, removing asbestos tiles might cost less than dealing with sprayed-on asbestos insulation.
To get an accurate estimate for your specific situation, it’s best to contact local asbestos removal professionals. They can assess your home and provide a detailed quote based on your unique circumstances.
How Much Time Does Residential Asbestos Removal Take?
The time required for residential asbestos removal depends on several factors:
- Home size
- Asbestos contamination extent
- Removal process complexity
- Material type and location
Asbestos removal timeline for homes can range from a single day to several weeks. Here’s a general overview:
| Project Type | Typical Duration |
| Single room or small area | 1-3 days |
| Multiple rooms | 3-7 days |
| Whole house | 1-3 weeks |
| Large or intricate projects | 3+ weeks |
These timeframes account for the entire process, including:
- Initial inspection and testing
- Setting up containment areas
- Actual asbestos removal
- Cleanup and decontamination
- Final air quality testing
The type of asbestos-containing material affects the time required for residential asbestos removal. For example:
- Popcorn ceiling removal: 1-3 days per 1000 sq ft
- Pipe insulation: 1-2 days per 100 linear ft
- Flooring tiles: 2-4 days per 1000 sq ft
- Siding: 3-5 days for an average-sized home
Factors that can extend the timeline:
- Difficult-to-reach areas
- Need for specialized equipment
- Weather conditions (for exterior work)
- Discovery of additional asbestos during the project
It’s important to note that rushing asbestos removal can lead to unsafe practices. Professional contractors balance efficiency with thoroughness to ensure your home is properly decontaminated.
When planning your project, allow extra time for unexpected issues. Also, consider that you may need to vacate your home during the removal process, depending on the project’s scope.
To get a precise timeline for your specific situation, consult with licensed asbestos removal professionals. They can assess your home and provide a detailed schedule based on your unique circumstances.
How Much Does Residential Asbestos Encapsulation Cost?
Residential asbestos encapsulation is often less expensive than complete removal. However, costs can vary based on several elements:
- Size of the area to be encapsulated
- Type of asbestos-containing material
- Condition of the asbestos-containing material
- Accessibility of the area
- Type of encapsulant used
Average price ranges:
- Small projects (e.g., encapsulating pipes in a basement): $2 – $6 per square foot
- Medium projects (e.g., encapsulating a popcorn ceiling): $5 – $8 per square foot
- Large projects (e.g., encapsulating attic insulation): $4 – $7 per square foot
Additional expenses to consider:
- Initial asbestos inspection and testing: $400 – $900
- Post-encapsulation air quality testing: $400 – $900
Comparing encapsulation to removal:
Encapsulation is typically 15% to 25% less expensive than removal. For example:
- Encapsulating a 500 sq ft area might cost $2,500 – $4,000
- Removing asbestos from the same area might cost $3,000 – $5,000
However, keep in mind that encapsulation is not a permanent solution. You may need to budget for ongoing inspections and potential re-encapsulation in the future.
When getting quotes, ensure they include all aspects of the job, including preparation, encapsulation, cleanup, and testing. As with removal, it’s important to get multiple quotes from certified professionals and not simply choose the lowest bid.
While encapsulation can be a cost-effective option in the short term, consider your long-term plans for the property when deciding between encapsulation and removal.
How Much Time Does Residential Asbestos Encapsulation Take?
Asbestos encapsulation timeline in homes is typically shorter than complete removal. The process involves applying a sealant over asbestos-containing materials to prevent fiber release.
| Project Scope | Typical Duration |
| Single room | 4-8 hours |
| Multiple rooms | 1-2 days |
| Whole house | 2-5 days |
Factors affecting the timeline:
- Area size
- Material type
- Surface preparation needs
- Encapsulant type
- Drying time
Comparing encapsulation to removal:
| Process | Small Area | Whole House |
| Encapsulation | 1 day | 2-5 days |
| Removal | 1-3 days | 1-3 weeks |
Encapsulation steps and timeframes:
- Inspection and planning: 1-2 hours
- Area preparation: 2-4 hours
- Encapsulant application: 2-6 hours per room
- Drying time: 24-48 hours (varies by product)
- Final inspection: 1-2 hours
The type of encapsulant used can impact the timeline:
- Water-based acrylics: Faster application, shorter drying time
- Epoxy-based products: Longer application, extended curing period
Factors that might extend the timeline:
- Extensive surface preparation
- Hard-to-reach areas
- Multiple coats required
- Ventilation issues affecting drying time
While encapsulation is often quicker than removal, it’s not always the best solution. Consult with asbestos professionals to determine the most appropriate method for your situation.
Proper encapsulation requires skilled application. Hiring experienced contractors helps ensure the job is done correctly and efficiently, maximizing the long-term effectiveness of the encapsulation.
What Should I Do in an Asbestos Emergency?
An asbestos emergency can occur when asbestos-containing materials are unexpectedly disturbed, potentially releasing harmful fibers into the air. In case of an asbestos emergency, you should:
- Stop all activity immediately
- Cease any work or movement in the affected area
- Prevent others from entering
- Seal off the area
- Close doors and windows
- Use plastic sheeting and tape to cover openings
- Turn off HVAC systems
- Prevent air circulation that could spread fibers
- Do not attempt to clean up
- Avoid sweeping, vacuuming, or dusting
- Leave the area
- Evacuate everyone from the affected space
- Change and bag clothes
- Remove potentially contaminated clothing
- Seal in plastic bags for proper disposal
- Contact professionals
- Call licensed asbestos removal experts
- Notify local health department
- Document the incident
- Take photos (if safe to do so)
- Note time, location, and circumstances
- Arrange for air testing
- Professional assessment of fiber levels
- Follow expert advice
- Adhere to recommendations for cleanup and safety
Key steps for handling asbestos emergencies at home:
- Remain calm
- Minimize movement and air disturbance
- Contact professionals quickly
- Do not attempt DIY cleanup
Emergency services available:
- 24/7 asbestos removal companies
- Local health department hotlines
- Environmental protection agency resources
After the emergency:
- Have professionals conduct a thorough inspection
- Implement recommended remediation measures
- Consider long-term management or removal options
Prevention is key. Maintain an up-to-date asbestos register for your home, and always consult professionals before starting renovations or repairs in older buildings.
How Quickly Can Asbestos Be Safely Removed in an Emergency?
The asbestos emergency removal timeline varies based on:
- Incident severity
- Affected area size
- Asbestos-containing material type
- Emergency response team availability
Typical response times range as follows:
- Initial containment: 2-4 hours
- Professional assessment: 4-8 hours
- Full removal: 24-72 hours
Rapid asbestos removal usually follows these steps:
- Emergency call (30 minutes – 2 hours)
- Site assessment (1-2 hours)
- Containment setup (2-4 hours)
- Removal process (6-48 hours, based on scope)
- Clearance testing (4-24 hours for results)
Elements affecting removal speed include location accessibility, time of day or week, regulatory requirements, and disposal facility availability.
Case 1: Residential pipe burst
- Asbestos insulation exposed in basement
- Total time from call to completion: 13 hours
Case 2: Commercial renovation accident
- Ceiling tiles damaged during remodeling
- Total time from call to completion: 29 hours
While quick action is important, safety remains the top priority. Rushing the process can lead to inadequate containment or incomplete removal. Emergency services often provide 24/7 response, but actual removal may be delayed to ensure proper preparations and safety measures.
For the fastest and safest outcome:
- Have an emergency plan ready
- Know local asbestos removal companies
- Act quickly to minimize contamination spread
Even in emergencies, only licensed professionals should handle asbestos removal to ensure safety and regulatory compliance.
Why Hire Certified Asbestos Removal Professionals for Commercial Buildings?
Hiring certified asbestos contractors for commercial buildings is essential for several reasons:
Safety: Certified asbestos removal professionals have the training and equipment to handle asbestos safely. They follow strict protocols to prevent fiber release and protect building occupants, workers, and the environment.
Compliance: Commercial buildings must adhere to strict regulations regarding asbestos management. Certified contractors understand these rules and ensure all work meets legal requirements, helping you avoid costly fines and penalties.
Legal Liability: Using uncertified contractors can expose building owners to significant legal risks. If asbestos is mishandled, resulting in exposure, you could face lawsuits from employees, tenants, or visitors.
Expertise: Asbestos removal professionals bring specialized knowledge to each project. They can:
- Accurately identify asbestos-containing materials
- Develop comprehensive removal plans
- Use advanced containment and removal techniques
- Properly dispose of asbestos waste
Insurance: Many insurance policies require the use of certified contractors for asbestos work. Using uncertified workers could void your coverage, leaving you financially vulnerable.
Long-term Cost Savings: While certified contractors may have higher upfront costs, their expertise can prevent future problems and expenses related to improper asbestos handling.
Benefits of hiring certified asbestos removal professionals:
- Reduced health risks for building occupants
- Compliance with local, state, and federal regulations
- Minimized business disruption during removal
- Proper documentation for future property transactions
- Access to state-of-the-art removal techniques and equipment
- Peace of mind knowing the job is done right
Risks of using uncertified contractors:
- Improper removal leading to asbestos fiber release
- Regulatory violations and associated fines
- Increased liability and potential lawsuits
- Incomplete or ineffective asbestos removal
- Lack of proper insurance coverage
- Potential for future costly remediation
Certification ensures that contractors have undergone rigorous training and testing. They stay updated on the latest asbestos removal techniques and safety standards. This expertise is invaluable for commercial buildings where the stakes are high and the asbestos situations can be complex.
Asbestos removal in commercial buildings often requires specialized approaches due to unique building materials, occupied spaces, and business continuity needs. Certified professionals have the skills to navigate these challenges effectively.
When selecting a contractor, look for relevant certifications and ask about their experience with similar commercial projects. Prioritizing certified asbestos removal professionals protects your property, your occupants, and your business interests.
How to Choose the Right Asbestos Removal Contractor?
Selecting the right asbestos removal contractor is crucial for your commercial project’s success. Here’s how to make an informed decision:
1. Verify Certification and Licensing
- Check for valid state and federal certifications
- Ensure licenses are current and appropriate for your project
2. Assess Experience
- Look for contractors with extensive commercial experience
- Ask about similar projects they’ve completed
3. Review Client Testimonials
- Read online reviews and ratings
- Request references from past commercial clients
4. Evaluate Insurance Coverage
- Confirm they have adequate liability insurance
- Check for worker’s compensation coverage
5. Analyze Cost Estimates
- Get detailed, written estimates from multiple contractors
- Be wary of quotes significantly lower than others
6. Examine Safety Records
- Ask about their safety protocols and training programs
- Check for any history of violations or accidents
7. Consider Communication and Professionalism
- Assess their responsiveness and clarity in explanations
- Look for contractors who are willing to answer all your questions
Checklist for choosing an asbestos contractor:
□ Valid certifications and licenses □ Proven commercial experience □ Positive client testimonials □ Comprehensive insurance coverage □ Detailed, competitive cost estimate □ Strong safety record □ Clear communication and professionalism □ Willingness to provide a written contract □ Knowledge of local regulations □ Proper equipment and resources for the job
Comparison table for evaluating contractors:
| Criteria | Contractor A | Contractor B | Contractor C |
| Years in business | |||
| Certifications | |||
| Commercial experience | |||
| Insurance coverage | |||
| Cost estimate | |||
| Safety record | |||
| Client ratings (1-5) |
When choosing an asbestos contractor:
- Don’t rush the decision-making process
- Ask for proof of claims made by the contractor
- Consider the overall value, not just the lowest price
- Ensure they’re willing to obtain necessary permits
- Verify they’ll provide air quality testing after removal
Remember, the best asbestos removal companies often have waiting lists due to high demand. Plan ahead and be prepared to schedule your project in advance.
By thoroughly vetting potential contractors, you can ensure a safe, compliant, and effective asbestos removal process for your commercial property. The right contractor will prioritize safety, follow regulations, and provide peace of mind throughout the project.
What Happens After Asbestos Is Removed From Commercial Properties?
After asbestos removal, several key steps ensure the safety and compliance of commercial properties:
1. Thorough Cleanup
- Removal of all asbestos-containing materials
- Proper disposal of contaminated items
- HEPA vacuuming of all surfaces
2. Visual Inspection
- Certified inspector examines the area
- Checks for any remaining visible asbestos
3. Air Quality Testing
- Collection of air samples
- Analysis by accredited laboratory
- Ensures fiber levels are below legal limits
4. Encapsulation (if necessary)
- Application of sealants to treated areas
- Prevents any potential fiber release
5. Final Clearance
- Review of all test results
- Issuance of clearance certificate
6. Documentation
- Compilation of removal and testing records
- Creation of updated asbestos management plan
7. Reoccupation
- Removal of containment barriers
- Safe return of occupants to the area
Post-removal procedures importance:
- Confirms complete asbestos removal
- Ensures regulatory compliance
- Protects building occupants’ health
- Provides legal documentation
- Allows safe building reuse
Key considerations after asbestos removal:
- Maintain all documentation for future reference
- Update building plans to reflect asbestos removal
- Train staff on new asbestos management procedures
- Schedule regular inspections of treated areas
- Plan for ongoing air quality monitoring
Remember, the post-removal process is as crucial as the removal itself. It provides assurance that the property is safe and compliant with regulations.
Flowchart: Post-Asbestos Removal Steps
[Asbestos Removal Completed] → [Thorough Site Cleanup] → [Visual Inspection] → [Air Quality Testing] → [Encapsulation (if needed)] → [Final Clearance Inspection] → [Documentation Compilation] → [Update Asbestos Management Plan] → [Remove Containment Barriers] → [Safe Reoccupation]
This process ensures that after asbestos removal, the commercial property is thoroughly cleaned, tested, and certified safe for use. It’s essential to work with certified professionals throughout this process to maintain safety and compliance standards.
Property owners should keep all post-removal documentation, as it may be required for future renovations, property sales, or regulatory inspections. This documentation also provides peace of mind to building occupants and stakeholders.
Why Is Post-Removal Air Quality Testing Important For Commercial Properties?
Post-removal air quality testing plays a key role in ensuring that asbestos abatement in commercial properties is successful. This testing verifies that asbestos fibers have been properly removed and are not lingering in the air, which could pose health risks to occupants.
Here’s how post-removal asbestos air testing typically works:
- Air samples are collected using specialized equipment.
- The samples are analyzed in a laboratory to measure airborne asbestos fiber concentrations.
- Results are compared to safety standards and pre-removal levels.
The air testing results provide concrete data on whether the removal process was effective. If fiber levels exceed acceptable limits, additional cleaning may be necessary before the space can be safely reoccupied.
Some key benefits of post-removal air quality testing include:
- Confirming the effectiveness of the abatement work
- Providing documentation of safety for liability purposes
- Giving peace of mind to building owners and occupants
- Ensuring compliance with regulations
Here’s a comparison of typical pre- and post-removal air quality levels:
| Metric | Pre-Removal | Post-Removal (Target) |
| Asbestos fibers per cubic centimeter | 0.01 – 0.1 | < 0.01 |
| Clearance criteria met | No | Yes |
| Safe for occupancy | No | Yes |
By conducting thorough post-removal air quality assessments, commercial property owners can be confident that their asbestos abatement efforts have created a safer environment for all building occupants.
Why Is Post-Encapsulation Air Quality Testing Important For Commercial Properties?
Post-encapsulation air quality testing is essential for commercial properties to verify the effectiveness of asbestos containment measures. This testing ensures that encapsulated asbestos materials remain secure and are not releasing fibers into the air.
The process of air testing after encapsulation typically involves:
- Setting up air sampling equipment in strategic locations
- Running the samplers for a specified duration
- Collecting and analyzing the air samples
- Comparing results to established safety thresholds
Post-encapsulation safety checks use standardized methods to assess air quality:
- Phase Contrast Microscopy (PCM) for general fiber counting
- Transmission Electron Microscopy (TEM) for specific asbestos fiber identification
These tests help determine if the encapsulation has successfully prevented asbestos fiber release. Safety standards often require airborne asbestos levels to be below 0.01 fibers per cubic centimeter for clearance.
Benefits of post-encapsulation air quality testing include:
- Confirming the integrity of the encapsulation
- Identifying any weak points in the containment
- Providing documentation for regulatory compliance
- Ensuring a safe environment for building occupants
Here’s a simple diagram illustrating the air quality testing process after encapsulation:
Air Quality Testing After Asbestos Encapsulation
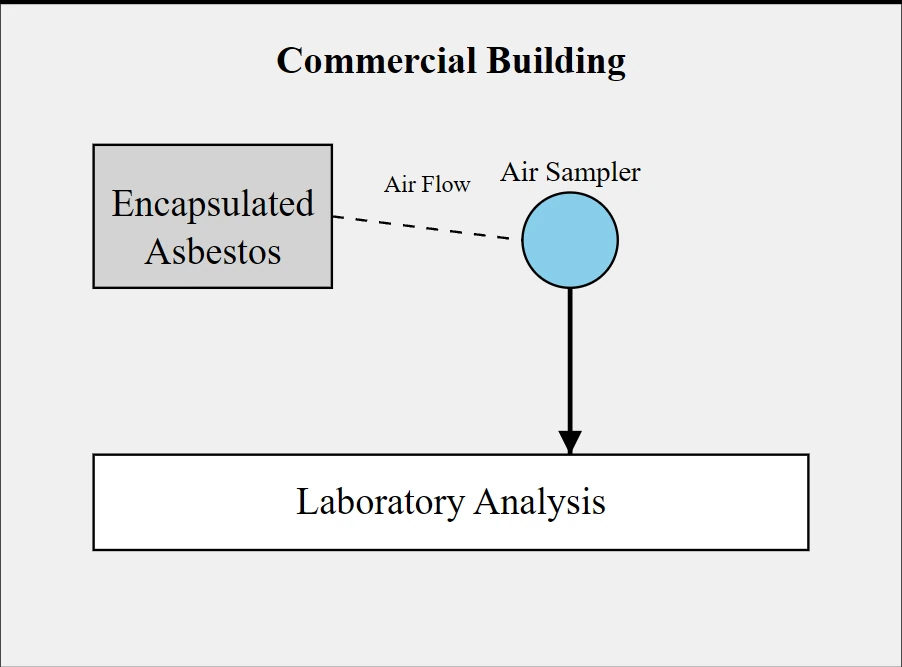
This diagram shows:
- The encapsulated asbestos area
- An air sampler collecting air samples
- The flow of air from the encapsulated area to the sampler
- The process of sending samples for laboratory analysis
Regular post-encapsulation air testing helps maintain a safe environment in commercial properties by ensuring the continued effectiveness of asbestos containment measures.